Linux配置cuda + cudnn深度学习环境
1.查看Linux系统版本信息
cat /etc/issue
2.查看显卡型号
lspci |grep -i nvidia
# 如果出现的信息看不出是什么型号,可能是由于驱动问题无法显示显卡的具体型号,如出现类似如下信息:
01:00.0 VGA compatible controller: NVIDIA Corporation Device 2204 (rev a1)
01:00.1 Audio device: NVIDIA Corporation Device 1aef (rev a1)
# 当出现这种情况,需要将出现的数字(2204)输入如下网站,可以查询出对应的硬件型号
http://pci-ids.ucw.cz/mods/PC/10de?action=help?help=pci
3.根据1,2得到的信息,查找合适的驱动版本,并下载。网站如下:
https://www.nvidia.cn/Download/index.aspx?lang=cn#
4.卸载当前显卡驱动,安装新的显卡驱动。
1. 屏蔽开源驱动 nouveau
sudo vim /etc/modprobe.d/blacklist.conf
在文件最后部分插入以下两行内容:
blacklist nouveau
options nouveau modeset=0
2. 删除旧NVIDIA驱动
sudo nvidia-uninstall
sudo apt-get purge nvidia-*
sudo apt-get remove --purge nvidia-\*
3. 重启电脑
sudo reboot
4. 关闭图形界面
sudo service lightdm stop
如果提示 unit lightdm.service not loaded
则先安装LightDm: sudo apt install lightdm
安装完毕后跳出一个界面,选择lightdm,再sudo service lightdm stop
5. 执行安装驱动
sudo chmod a+x NVIDIA....(自行下载的驱动名)
sudo ./NVIDIA.....(自行下载的驱动名)
遇到Would you like to register the kernel module sources with DKMS? This will allow DKMS to automatically build a new module, if you install a different kernel later
选择No
遇到The CC version check failed: ......
则退出安装,选择正确的gcc版本
sudo update-alternatives --config gcc
遇到Nvidia's 32-bit compatibility libraries?
选择No
遇到Would you like to run the nvidia-xconfigutility to automatically update your x configuration so that the NVIDIA x driver will be used when you restart x? Any pre-existing x confile will be backed up
选择Yes
6.安装完毕
nvidia-smi
5.查看cuda版本与显卡驱动版本的对应关系
https://docs.nvidia.com/cuda/cuda-toolkit-release-notes/index.html
6.下载安装cuda。在选择版本时,可以参考用的深度学习框架(如pytorch)支持到cuda哪个版本。
选择runfile格式。
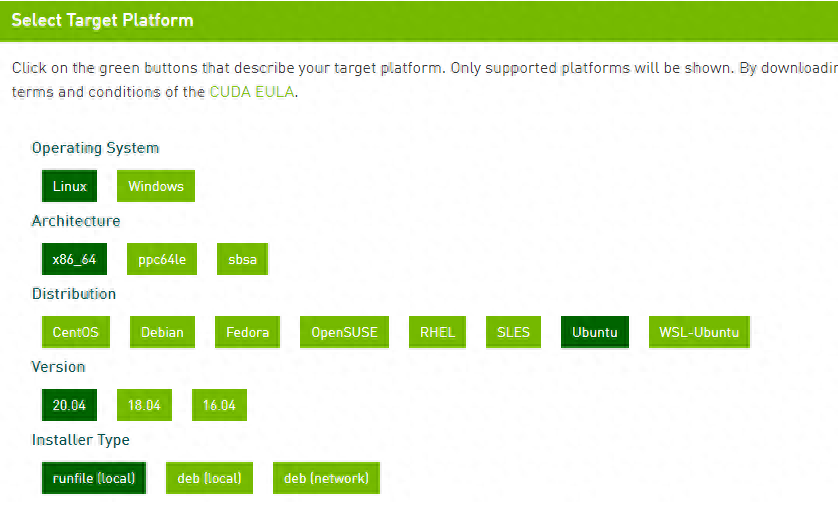
cuda版本选择
runfile安装过程中会提醒是否继续(Existing package manager installation of the driver found. It is strongly recommended that you remove this before continuing.),选择继续continue,在后续选择安装内容时去除驱动选择。
添加到系统环境变量中:
echo '# CUDA Soft Link' >> ~/.bashrc
echo 'export PATH=/usr/local/cuda-10.1/bin${PATH:+:${PATH}}' >> ~/.bashrc
echo 'export LD_LIBRARY_PATH=/usr/local/cuda-10.1/lib64${LD_LIBRARY_PATH:+:${LD_LIBRARY_PATH}}' >> ~/.bashrc
source ~/.bashrc
后测试一下CUDA是否成功安装,运行nvcc -V:
nvcc: NVIDIA (R) Cuda compiler driver
Copyright (c) 2005-2020 NVIDIA Corporation
Built on Tue_Sep_15_19:10:02_PDT_2020
Cuda compilation tools, release 11.1, V11.1.74
Build cuda_11.1.TC455_06.29069683_0
7.下载安装cudnn
https://developer.nvidia.com/cudnn
下载之后解压:
tar zxvf + 文件名
然后执行(版本号需要替换):
sudo cp cuda/include/cudnn.h /usr/local/cuda-10.1/include
sudo cp cuda/lib64/libcudnn* /usr/local/cuda-10.1/lib64
sudo chmod a+r /usr/local/cuda-10.1/include/cudnn.h
sudo chmod a+r /usr/local/cuda-10.1/lib64/libcudnn*
8.测试cuda和cudnn是否可用的代码
import torch
print(2.0)
device = torch.device("cuda:0" if torch.cuda.is_available() else "cpu")
# Assume that we are on a CUDA machine, then this should print a CUDA device:
print(device)
x = torch.Tensor([2.1])
xx = x.cuda()
print(xx)
# CUDNN TEST
from torch.backends import cudnn
print('cudann is ' + str(cudnn.is_acceptable(xx)))
相关推荐
-
 linux之chsh命令2024-05-07 18:53:31
 -
Linux Namespace浅析2024-05-07 16:46:07
-
 Linux-多进程开发,看完就明白了2024-05-07 14:18:13
 -
 linux 安装vue 很简单2024-05-07 12:59:50
 -
 在 Linux 上用 zram 替代传统交换空间2024-05-07 11:13:30