
Nginx + Lua 搭建网站WAF防火墙
目录:
- 前言
- 1.在线安装
- 1.1.修改yum源地址
- 1.2.在线安装Nginx
- 1.3.端口放行
- 1.4.验证安装
- 2.知识拓展
- 2.1.编译参数
- 2.2.安装目录
- 2.3.默认配置
- 2.4.systemctl配置
- 3.编译安装
- 3.1.安装编译环境
- 3.2.Nginx编译安装
- 3.2.1.下载解压
- 3.2.2.配置编译参数
- 3.2.3.进行编译安装
- 3.2.4.配置systemctl
- 3.2.5.端口放行
- 3.2.6.验证
- 3.3.编译安装Lua模块
- 大体思路
- 3.3.1.编译安装luajit并导入环境变量
- 3.3.2.共享lua动态库
- 3.3.3.配置nginx的编译参数
- 3.3.4.重新编译安装nginx
- 3.3.5.验证Lua模块
- 4.Nginx+Lua搭建WAF防火墙
- 4.1.环境
- 4.2.配置
- 4.3.生效
- 4.4.简单验证
- 4.5.CC验证
- 扩展:隐藏Nginx版本信息
前言
对于项目里面只是使用代理等常用功能,在线安装即可,如需制定化模块,则推荐编译安装
PS:本文不仅仅包含Nginx相关的知识点,还包含了逆天学习方法(对待新事物的处理)
1.在线安装
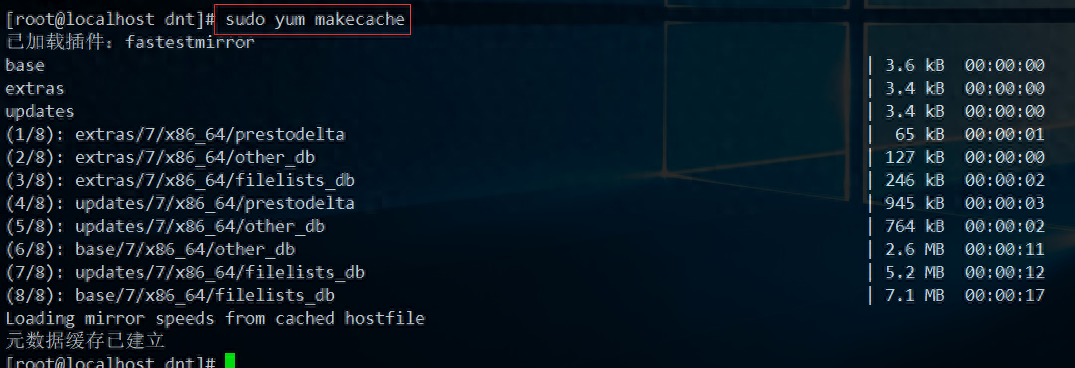
1.1.修改yum源地址

更新软件包缓存:yum makecache
1.2.在线安装Nginx
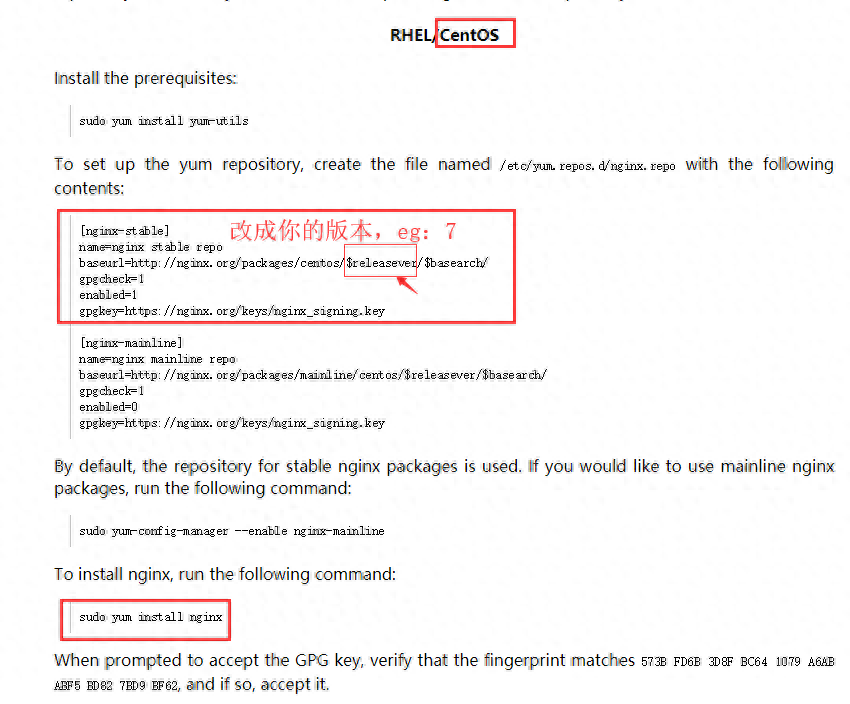
在线安装比较简单,参考官方文档即可
PS:线上选stable的就行了,记得把$releasever改成你的版本号,eg:7
安装图示:
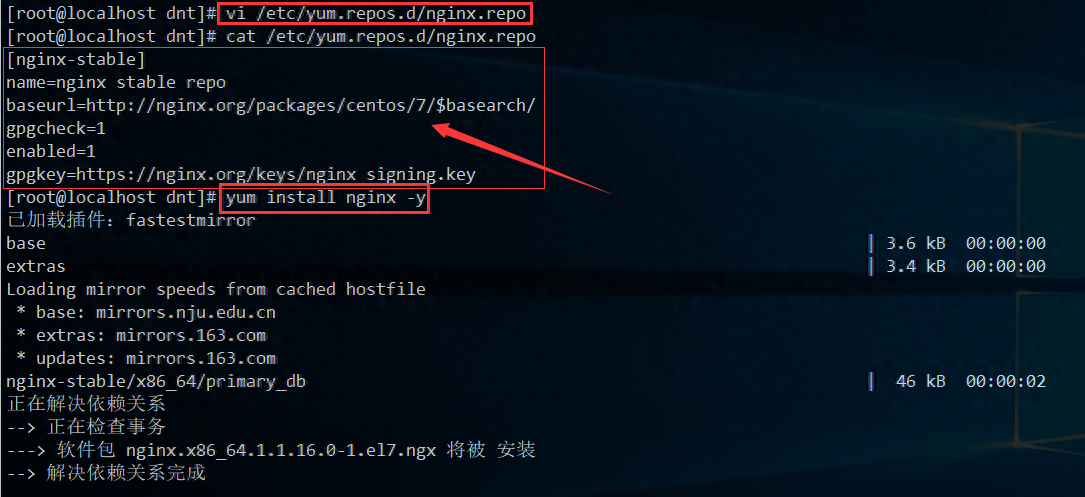
# 创建nginx的yum
vi /etc/yum.repos.d/nginx.repo

# 内容如下:
[nginx-stable]
name=nginx stable repo
baseurl=http://nginx.org/packages/centos/7/$basearch/
gpgcheck=1
enabled=1
gpgkey=https://nginx.org/keys/nginx_signing.key

# 在线安装
yum install nginx -y
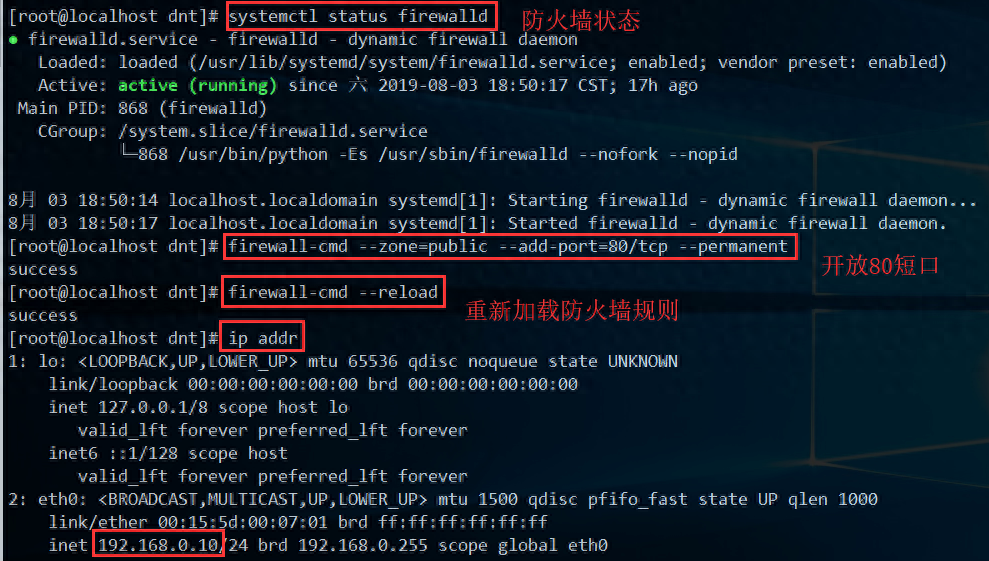
1.3.端口放行
放行80端口:firewall-cmd --zone=public --add-port=80/tcp --permanent
PS:规则生效:firewall-cmd --reload

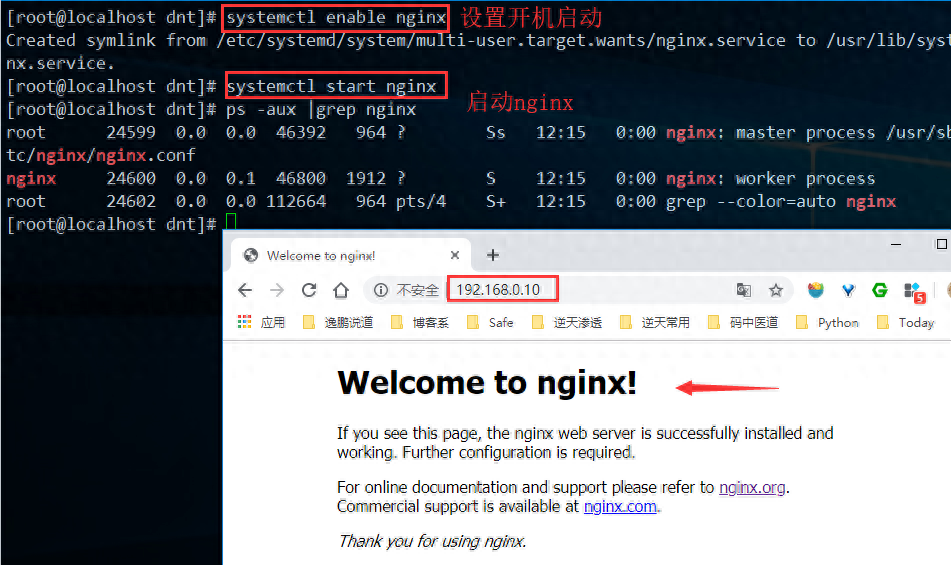
1.4.验证安装
2.知识拓展
2.1.编译参数
离线安装可以参考在线安装的配置:nginx -V:编译参数(nginx -v:查看版本)
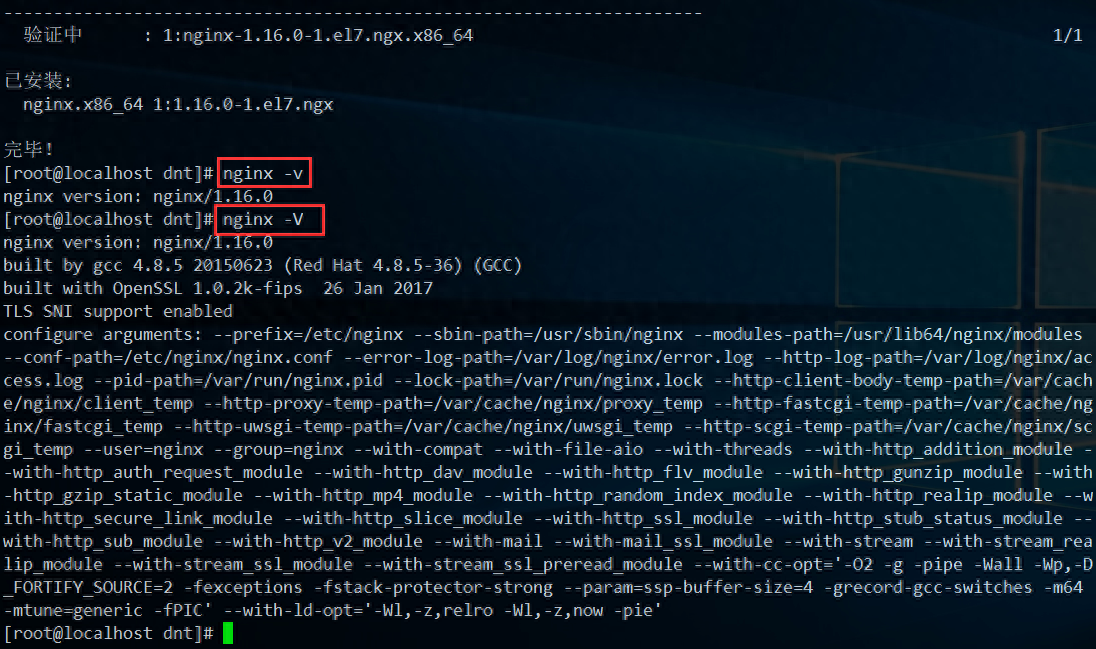
编译参数详解(点我展开)
2.2.安装目录
在线安装的包都可以通过:rpm -ql xxx查看安装到哪些目录
安装目录详解(点我展开)
2.3.默认配置
配置语法检查:nginx -t -c /etc/nginx/nginx.conf
PS:不重启的方式加载配置:Nginx -s reload -c /etc/nginx/nginx.conf
全局以及服务级别的配置:
参数 | 说明 |
user | 使用用户来运行nginx |
worker_processes | 工作进程数 |
error_log | nginx的错误日记 |
pid | nginx启动时的pid |
events相关配置:
参数 | 说明 |
worker_connections | 每个进程的最大连接数 |
use | 工作进程数 |
常用中间件配置:
http {
    ......
    server {
        listen          80;             # 端口号
        server_name     localhost;      # 域名
        # 路径访问控制(默认访问路径,eg:/ ==> 根目录)
        location / {
            root /usr/share/nginx/html; # 网站根目录
            index index.html index.htm index.py; # 首页配置
        }

        error_page 500 502 503 504 /50x.html; # 错误页面(可以自定义添404页面,error_page 404 /404.html;...)
        # 访问xxx/50x.html的时候去指定目录找
        location = /50x.html {
            root /usr/share/nginx/html; # 错误页面所在路径
        }
    }
    # 一个server配置一个虚拟 or 独立的站点(通过listen和server_name来区别多个server)
    server {
        ......
    }
}
2.4.systemctl配置
nginx:(等会编译安装的时候可以参考)
[root@localhost dnt]# cat /usr/lib/systemd/system/nginx.service
[Unit]
Description=nginx - high performance web server
Documentation=http://nginx.org/en/docs/
After=network-online.target remote-fs.target nss-lookup.target
Wants=network-online.target

[Service]
Type=forking
PIDFile=/var/run/nginx.pid
ExecStart=/usr/sbin/nginx -c /etc/nginx/nginx.conf
ExecReload=/bin/kill -s HUP $MAINPID
ExecStop=/bin/kill -s TERM $MAINPID

[Install]
WantedBy=multi-user.target
nginx-debug:
[root@localhost dnt]# cat /usr/lib/systemd/system/nginx-debug.service
[Unit]
Description=nginx - high performance web server
Documentation=http://nginx.org/en/docs/
After=network-online.target remote-fs.target nss-lookup.target
Wants=network-online.target

[Service]
Type=forking
PIDFile=/var/run/nginx.pid
ExecStart=/usr/sbin/nginx-debug -c /etc/nginx/nginx.conf
ExecReload=/bin/kill -s HUP $MAINPID
ExecStop=/bin/kill -s TERM $MAINPID

[Install]
WantedBy=multi-user.target
3.编译安装
3.1.安装编译环境
一步到位:yum install gcc-c++ pcre pcre-devel zlib zlib-devel openssl openssl-devel -y
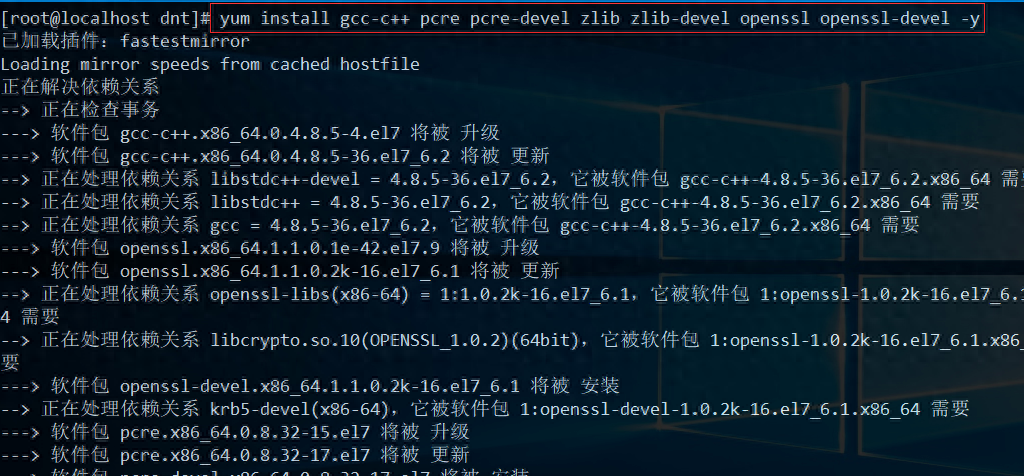
简单拆分解析一下:
- Nginx使用C/C++编写的,安装一下依赖:yum install gcc-c++ -y
- Nginx需要使用PCRE来进行正则解析:yum install pcre pcre-devel -y
- 现在服务器和浏览器一般都是使用gzip:yum install -y zlib zlib-devel -y
- 让Nginx支持https:yum install openssl openssl-devel -y
3.2.Nginx编译安装
3.2.1.下载解压
先编译安装一下,后面说lua模块的时候再重新编译下就行了
下载:curl -o nginx.tar.gz http://nginx.org/download/nginx-1.16.0.tar.gz
解压:tar -zxvf nginx.tar.gz
3.2.2.配置编译参数
参考前面说的在线版Nginx来设置编译参数的配置:
PS:nginx -V
切换到nginx的解压目录:cd nginx-1.16.0 然后执行下面命令
PS:root权限编译哦~
./configure --prefix=/etc/nginx --sbin-path=/usr/sbin/nginx --modules-path=/usr/lib64/nginx/modules --conf-path=/etc/nginx/nginx.conf --error-log-path=/var/log/nginx/error.log --http-log-path=/var/log/nginx/access.log --pid-path=/var/run/nginx.pid --lock-path=/var/run/nginx.lock --http-client-body-temp-path=/var/cache/nginx/client_temp --http-proxy-temp-path=/var/cache/nginx/proxy_temp --http-fastcgi-temp-path=/var/cache/nginx/fastcgi_temp --http-uwsgi-temp-path=/var/cache/nginx/uwsgi_temp --http-scgi-temp-path=/var/cache/nginx/scgi_temp --user=nginx --group=nginx --with-compat --with-file-aio --with-threads --with-http_addition_module --with-http_auth_request_module --with-http_dav_module --with-http_flv_module --with-http_gunzip_module --with-http_gzip_static_module --with-http_mp4_module --with-http_random_index_module --with-http_realip_module --with-http_secure_link_module --with-http_slice_module --with-http_ssl_module --with-http_stub_status_module --with-http_sub_module --with-http_v2_module --with-mail --with-mail_ssl_module --with-stream --with-stream_realip_module --with-stream_ssl_module --with-stream_ssl_preread_module --with-cc-opt='-O2 -g -pipe -Wall -Wp,-D_FORTIFY_SOURCE=2 -fexceptions -fstack-protector-strong --param=ssp-buffer-size=4 -grecord-gcc-switches -m64 -mtune=generic -fPIC' --with-ld-opt='-Wl,-z,relro -Wl,-z,now -pie'
3.2.3.进行编译安装
接着编译安装:make && make install
PS:提速:make -j 4 && make install
3.2.4.配置systemctl
利用systemctl添加自定义系统服务

# vi /usr/lib/systemd/system/nginx.service
[Unit]
Description=nginx - high performance web server
Documentation=http://nginx.org/en/docs/
After=network-online.target remote-fs.target nss-lookup.target
Wants=network-online.target

[Service]
Type=forking
PIDFile=/var/run/nginx.pid
ExecStart=/usr/sbin/nginx -c /etc/nginx/nginx.conf
ExecReload=/bin/kill -s HUP $MAINPID
ExecStop=/bin/kill -s TERM $MAINPID

[Install]
WantedBy=multi-user.target
PS:如果不生效可以重载下systemctl:systemctl daemon-reload
3.2.5.端口放行
放行80端口:firewall-cmd --zone=public --add-port=80/tcp --permanent
PS:规则生效:firewall-cmd --reload
3.2.6.验证

运行的时候如果出现nginx: [emerg] getpwnam("nginx") failed的错误可以参考我写这篇文章:https://www.cnblogs.com/dotnetcrazy/p/11304783.html
PS:核心:useradd -s /sbin/nologin -M nginx
3.3.编译安装Lua模块
大体思路
默认是不支持Lua的,所以需要自己编译安装下
PS:记得安装下Lua库:yum install lua lua-devel -y
主要就3步走:
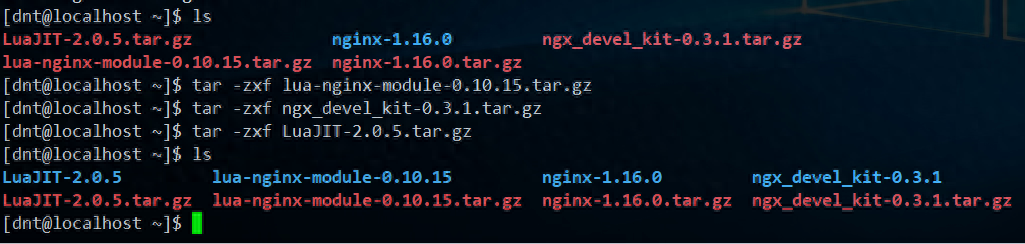
- 安装Lua即时编译器:LuaJIT目前最新:http://luajit.org/download/LuaJIT-2.0.5.tar.gz
- 安装Nginx模块:ngx_devel_kit and lua-nginx-modulengx_devel_kit:https://github.com/simplresty/ngx_devel_kit/archive/v0.3.1.tar.gzlua-nginx-module:https://github.com/openresty/lua-nginx-module/archive/v0.10.15.tar.gz
- 重新编译Nginx:复制在线安装的编译参数(nginx -V)然后添加两个参数--add-module=../ngx_devel_kit-0.3.1--add-module=../lua-nginx-module-0.10.15
3.3.1.编译安装luajit并导入环境变量
解压缩
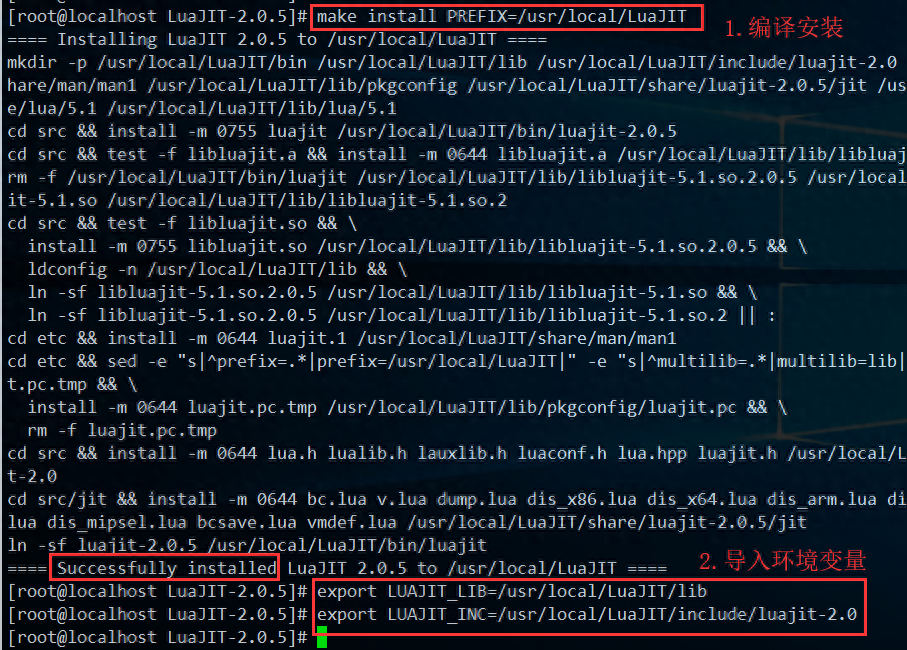
# 编译安装
make install PREFIX=/usr/local/LuaJIT
# 导入环境变量
export LUAJIT_LIB=/usr/local/LuaJIT/lib
export LUAJIT_INC=/usr/local/LuaJIT/include/luajit-2.0
3.3.2.共享lua动态库
加载lua库到ld.so.conf文件
echo "/usr/local/LuaJIT/lib" >> /etc/ld.so.conf
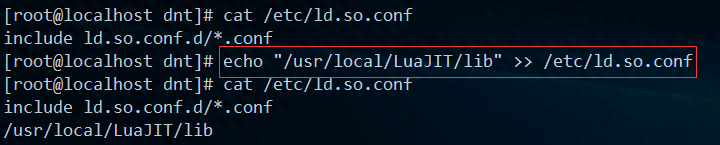
执行ldconfig让动态函式库加载到缓存中

3.3.3.配置nginx的编译参数
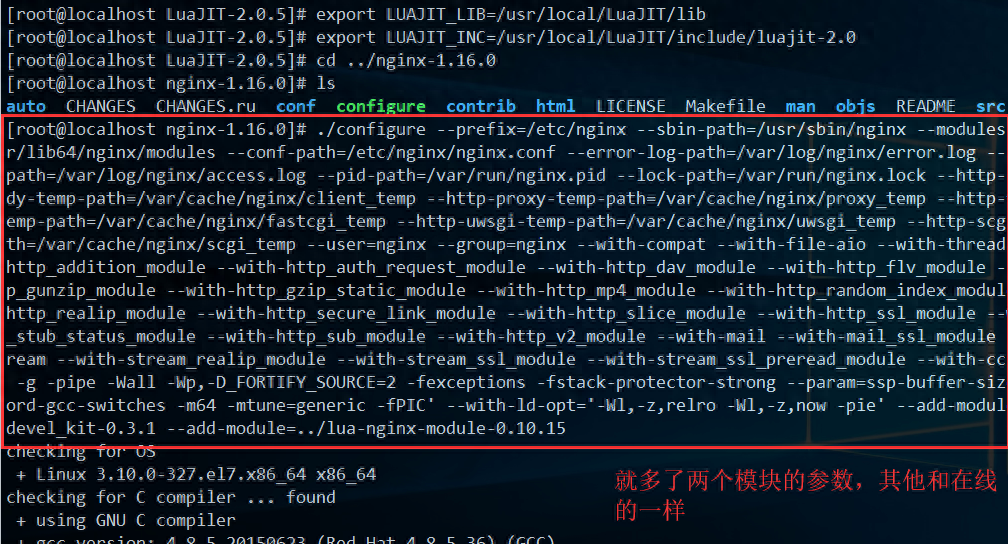
完整参数附录:
./configure --prefix=/etc/nginx --sbin-path=/usr/sbin/nginx --modules-path=/usr/lib64/nginx/modules --conf-path=/etc/nginx/nginx.conf --error-log-path=/var/log/nginx/error.log --http-log-path=/var/log/nginx/access.log --pid-path=/var/run/nginx.pid --lock-path=/var/run/nginx.lock --http-client-body-temp-path=/var/cache/nginx/client_temp --http-proxy-temp-path=/var/cache/nginx/proxy_temp --http-fastcgi-temp-path=/var/cache/nginx/fastcgi_temp --http-uwsgi-temp-path=/var/cache/nginx/uwsgi_temp --http-scgi-temp-path=/var/cache/nginx/scgi_temp --user=nginx --group=nginx --with-compat --with-file-aio --with-threads --with-http_addition_module --with-http_auth_request_module --with-http_dav_module --with-http_flv_module --with-http_gunzip_module --with-http_gzip_static_module --with-http_mp4_module --with-http_random_index_module --with-http_realip_module --with-http_secure_link_module --with-http_slice_module --with-http_ssl_module --with-http_stub_status_module --with-http_sub_module --with-http_v2_module --with-mail --with-mail_ssl_module --with-stream --with-stream_realip_module --with-stream_ssl_module --with-stream_ssl_preread_module --with-cc-opt='-O2 -g -pipe -Wall -Wp,-D_FORTIFY_SOURCE=2 -fexceptions -fstack-protector-strong --param=ssp-buffer-size=4 -grecord-gcc-switches -m64 -mtune=generic -fPIC' --with-ld-opt='-Wl,-z,relro -Wl,-z,now -pie' --add-module=../ngx_devel_kit-0.3.1 --add-module=../lua-nginx-module-0.10.15
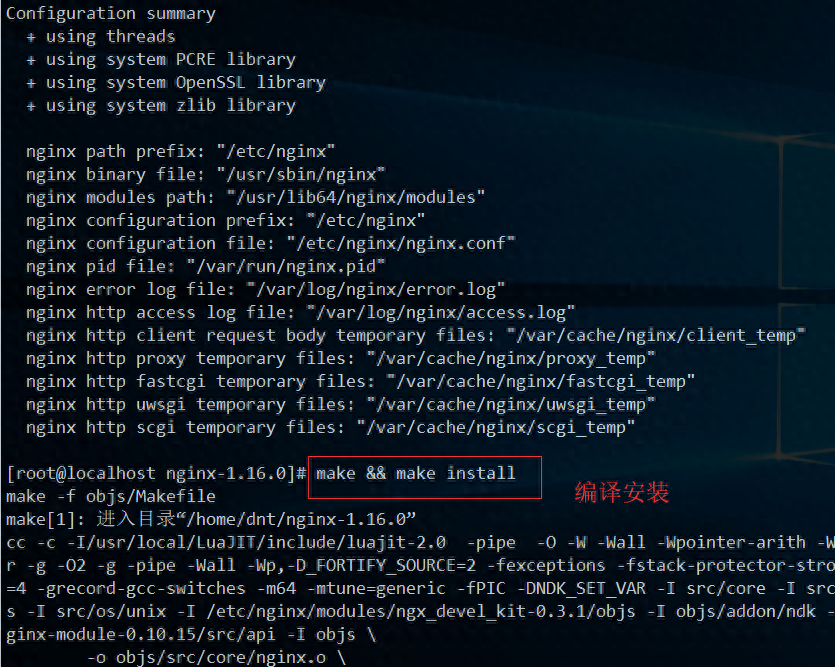
3.3.4.重新编译安装nginx
编译安装:make && make install
3.3.5.验证Lua模块
验证下Lua是否已经可用:
在nginx.config的server节点下添加:
PS:vi /etc/nginx/nginx.conf
server {
listen 80;
server_name localhost;
charset utf-8; # 默认编码为utf-8
location / {
root html;
index index.html index.htm;
}
...
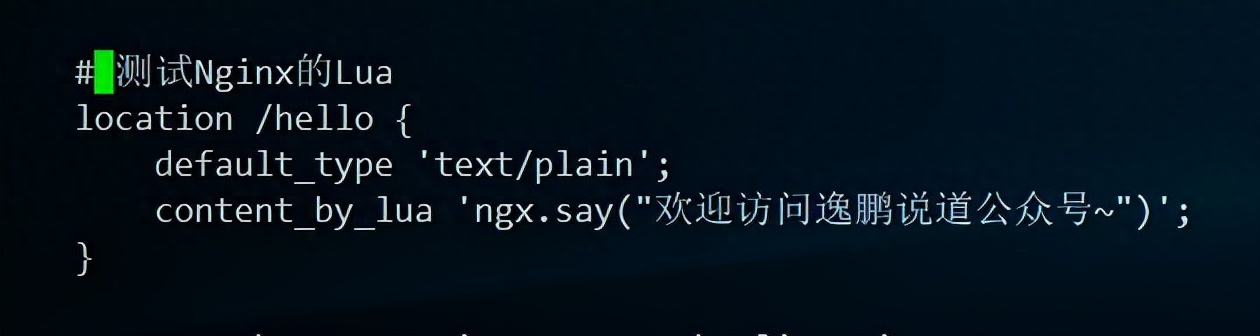
# 测试Nginx的Lua(添加这一段)
location /hello {
default_type 'text/plain';
content_by_lua 'ngx.say("欢迎访问逸鹏说道公众号~")';
}
...
}
检查配置:nginx -t -c /etc/nginx/nginx.conf
PS:配置生效:nginx -s reload -c /etc/nginx/nginx.conf

看看效果:

扩展:你可以试试获取ip哦~
# 获取客户端ip
location /myip {
    default_type 'text/plain';
    content_by_lua '
        clientIP = ngx.req.get_headers()["x_forwarded_for"]
        ngx.say("IP:",clientIP)
    ';
}
4.Nginx+Lua搭建WAF防火墙
市面上比较常用一块开源项目:ngx_lua_waf
https://github.com/loveshell/ngx_lua_waf
- 拦截Cookie类型工具
- 拦截异常post请求
- 拦截CC洪水攻击
- 拦截URL
- 拦截arg(提交的参数)

4.1.环境
clone代码并移动到nginx的waf目录下

简单说下里面的规则分别有啥用:
- args里面的规则get参数进行过滤的
- url是只在get请求url过滤的规则
- post是只在post请求过滤的规则
- whitelist是白名单,里面的url匹配到不做过滤
- user-agent是对user-agent的过滤规则
4.2.配置
修改必要配置
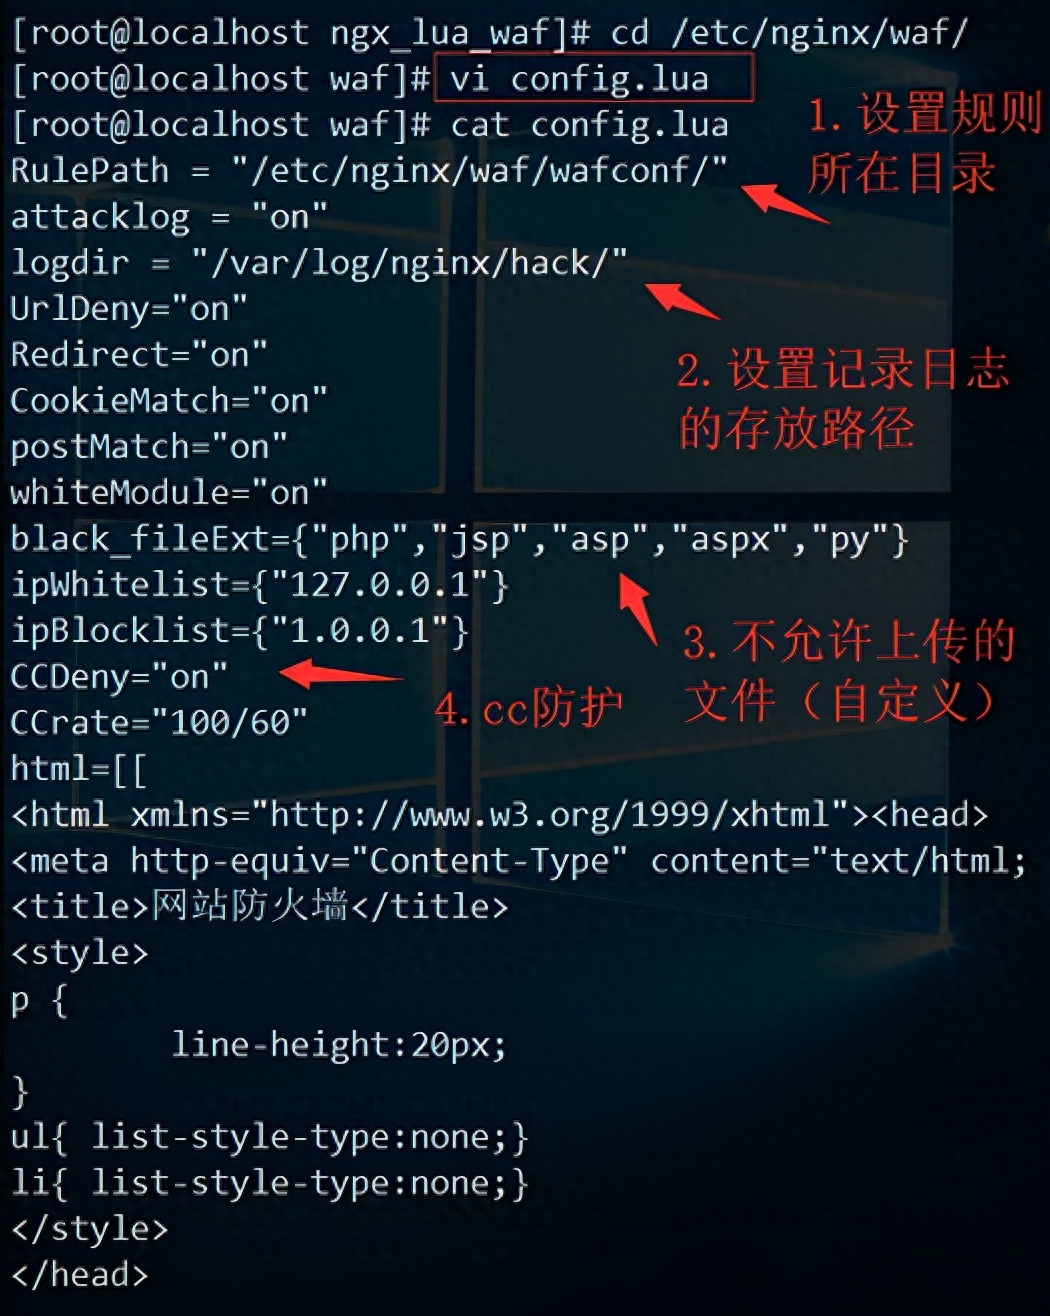
详细说明我引用一下我的上篇文章:
参数简单说明下:红色字体部分需要修改
nginx.config的http下添加如下内容:

lua_package_path "/etc/nginx/waf/?.lua";
lua_shared_dict limit 10m;
init_by_lua_file /etc/nginx/waf/init.lua;
access_by_lua_file /etc/nginx/waf/waf.lua;
4.3.生效
配置语法检查:nginx -t -c /etc/nginx/nginx.conf
PS:不重启的方式加载配置:Nginx -s reload -c /etc/nginx/nginx.conf

4.4.简单验证

PS:其实绕过很简单,看看他默认规则即可,这款WAF的强大之处在于轻量级,而且规则可以自定化
过滤规则在wafconf下,可根据需求自行调整,每条规则需换行,或者用|分割
举个例子:http://192.168.0.10/hello?id=1 or 1=1
PS:默认规则没有这点的防护

那么我们可以在args规则中添加比如\sor\s+,然后nginx -s reload一下就行了
PS:如果是从post进行注入,或者cookie中转注入,那么在对应规则里面添加就行,我这边只是演示下防火墙被绕过该怎么解决~(多看看日志)

4.5.CC验证
留个课后作业:使用ab来测试下nginx+lua的waf对cc的防御效果
提示:可以使用ab -n 2000 -c 200 http://192.168.0.10来简单测试
PS:测试前curl http://192.168.0.10/hello 看看返回内容,测试后再curl看看返回内容
扩展:隐藏Nginx版本信息
防止被黑客进行针对性渗透,隐藏下版本信息
PS:其他配置今天就不详细讲解了,下次讲Nginx的时候会说的
原来:

配置下:vi /etc/nginx/nginx.conf
http下添加:server_tokens off;
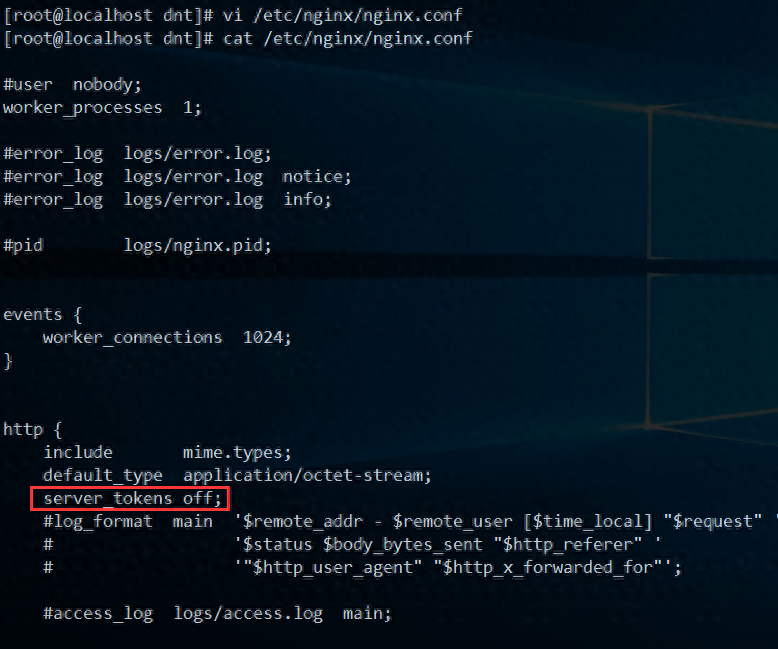
检查下语法:nginx -t
不重启的方式加载配置文件:nginx -s reload

现在效果:

相关推荐
-
 unix或centos离线安装jdk和nginx操作说明2023-10-23 15:41:26
 -
Nginx自定义数据结构之字符串(String)数组(Array)链表(List)
Nginx自定义数据结构之字符串(String)数组(Array)链表(List)2023-10-23 15:41:09 -
 Nginx的配置详解2023-10-23 15:40:54
 -
 Centos7 Nginx搭建局域网yum仓库详细步骤2023-10-23 15:38:59
 -
 nginx维护页面处置-全部URL指向同一个页面2023-10-23 15:35:52