
Nginx+.Net Core实现项目负载均衡
1037人浏览 2023-10-23 15:24:29
Nginx大家如果没用过那或多或少都应该听过,vue的部署、反向代理、负载均衡nginx都能帮你做到。
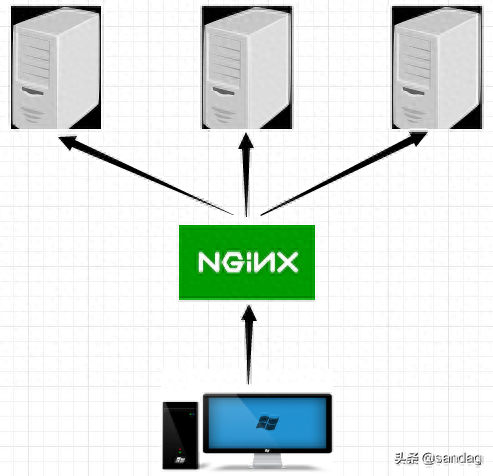
今天主要说一下nginx负载均衡我们的项目,如下图所示,请求到达nginx,nginx再帮我们转发。
首先使用Docker安装nginx.
docker pull nginx:latest
运行容器,将本地的8080端口映射到容器内部的 80 端口.
docker run --name nginx -p 8080:80 -d nginx
查看nginx容器,如果有错请看日志.

浏览器中访问一下

ok,到此我们的nginx就已安装完成。
我们准备好3个以上的webapi的项目并发布。
进入nginx容器
Docker exec -it nginx bash
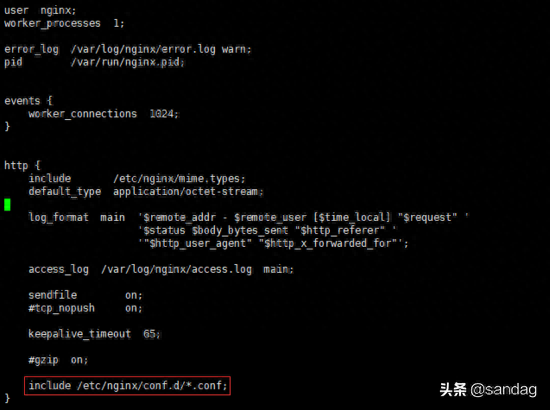
找到nginx.conf文件并作修改,nginx.conf分为http块、events块和server块,此次主要在server块中做更改.

此时在nginx容器里面使用vi或者vim没有用,需要依次执行如下两条命令
apt-get update
apt-get install vim
进入文件内,末尾处指向了另一个文件,没错这个文件里就是放server块配置内容
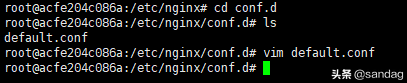
进入etc/nginx/conf.d/default.conf文件中并做修改
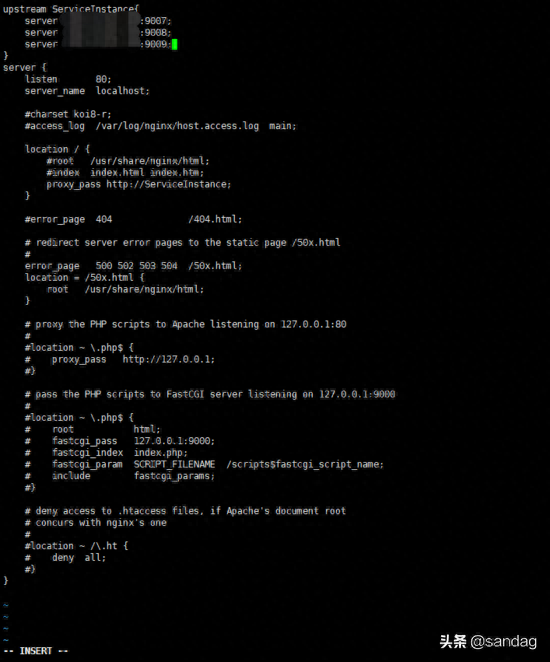
upstream ServiceInstance{
    #nginx默认轮询下面的服务实例
    server ***.**.***.***:9007;
    server ***.**.***.***:9008;
    server ***.**.***.***:9009;
}
server {
    listen       80;
    server_name  localhost;

    #charset koi8-r;
    #access_log  /var/log/nginx/host.access.log  main;

    location / {
        #root   /usr/share/nginx/html;
        #index  index.html index.htm;
        #请求到达后会进行转发
        proxy_pass http://ServiceInstance;
    }

    #error_page  404              /404.html;

    # redirect server error pages to the static page /50x.html
    #
    error_page   500 502 503 504  /50x.html;
    location = /50x.html {
        root   /usr/share/nginx/html;
    }

    # proxy the PHP scripts to Apache listening on 127.0.0.1:80
    #
    #location ~ \.php$ {
    #    proxy_pass   http://127.0.0.1;
    #}

    # pass the PHP scripts to FastCGI server listening on 127.0.0.1:9000
    #
    #location ~ \.php$ {
    #    root           html;
    #    fastcgi_pass   127.0.0.1:9000;
    #    fastcgi_index  index.php;
    #    fastcgi_param  SCRIPT_FILENAME  /scripts$fastcgi_script_name;
    #    include        fastcgi_params;
    #}

    # deny access to .htaccess files, if Apache's document root
    # concurs with nginx's one
    #
    #location ~ /\.ht {
    #    deny  all;
    #}
}
完成之后重启一下容器,如果有错误请查看日志.
docker restart nginx
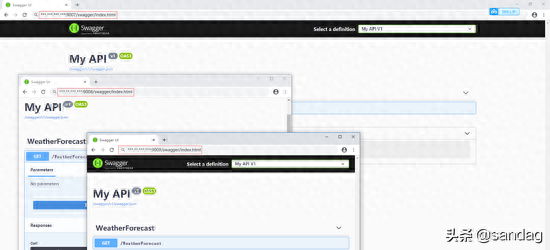
浏览器中调用一个接口查看
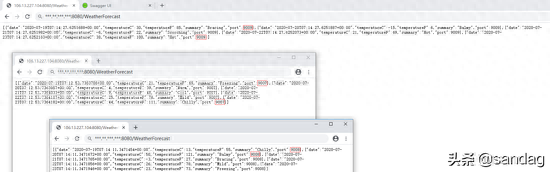
每一次都会轮询不同的服务实例,负载均衡的预期就实现了!
我们也可以设置权重比例,weight值越大,请求达到此实例的次数就越多!
upstream ServiceInstance{
    #nginx默认轮询下面的服务实例
    server ***.**.***.***:9007 weight=1;
    server ***.**.***.***:9008 weight=2;
    server ***.**.***.***:9009 weight=3;
}
各位同学也可慢慢研究,nginx很强大的!
相关推荐
-
 unix或centos离线安装jdk和nginx操作说明2023-10-23 15:41:26
 -
Nginx自定义数据结构之字符串(String)数组(Array)链表(List)
Nginx自定义数据结构之字符串(String)数组(Array)链表(List)2023-10-23 15:41:09 -
 Nginx的配置详解2023-10-23 15:40:54
 -
 Centos7 Nginx搭建局域网yum仓库详细步骤2023-10-23 15:38:59
 -
 nginx维护页面处置-全部URL指向同一个页面2023-10-23 15:35:52